null
Skip to main content
3D Resin Holiday Ornaments

3D Resin Holiday Ornaments

Posted by Kelly Johnson on Nov 8th 2022

Learn How To Make Resin Holiday Ornaments!

The tradition of making handmade ornaments to gift to friends and family has been one of my greatest joys during the holiday season for as long as I can remember. Oh, by the way, my name is Kelly Johnson, the Creation Developer here at MAS Epoxies! Today I’ll be walking you through a step-by-step process on how you can make these layered resin ornaments, that are perfect for any tree! This DIY project is fun, easy, and the results are gorgeous every time! From our MAS family to yours, Happy Holidays!


Materials Used:

  • MAS Epoxies Flag Resin and Medium Hardener
  • MAS Epoxies Table Top Pro
  • Sculpted Panels rounds
  • Painter’s tape
  • Variety of acrylic paints
  • Extra fine glitter
  • Painter’s pyramids
  • Vinyl cutting machine
  • Variety of vinyl
  • Ribbon or twine
  • Super glue
  • Isopropyl alcohol
  • Cotton swab
  • 220 grit palm sander
  • 3/16” drill bit
  • Sponge sander
  • Wood burning tool
  • Popsicle sticks
  • Mixing cups
  • Torch and heat gun

Here are the epoxy resin systems that are used in this project.


For this project, we will be using MAS Flag resin and Medium hardener. This is a versatile 2:1 system that is perfect for casting resin up to a 1/2” in silicone molds and it has a lower viscosity with excellent bubble release. The working time for this system is 20 minutes at 70˚F and can be recoated or another layer added once every 2 hours. Projects can be demolded 24 hours after pouring, sometimes sooner depending on your studio or workshop conditions.

We will also be using MAS Table Top Pro epoxy system. This two-part epoxy is an easy-to-use table top finish that is a maker’s dream medium! It’s compatible with color pigments, alcohol ink, acrylic paints, and more! This system has a 30 minute working time and can be recoated in about 2-4 hours after your pour.

Sold out

Sold out
Table Top Pro Epoxy for epoxy resin table

Sold out


STOP Scrolling! Check Out This Video First!


Here's the FULL tutorial!


Step 1: Prepping

Paint the base of the ornaments using a variety of acrylic paints. I mixed the colors to create a gradient effect with one being in shades of green and the other ornament in shades of blue.


Step 2: Taping

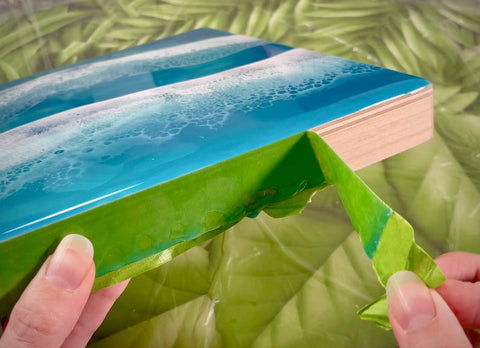
After the acrylic paint has dried, apply painter’s tape to the back and up the sides, forming a dam around the ornament. Trim the excess and make sure to press the tape down firmly to insure a leakproof seal.


Step 3: Base layer of epoxy resin

For this first layer of epoxy, I wanted to use a system that would cure quickly and have excellent bubble release (since the pour will be on the deeper side). MAS Epoxies Flag Resin and Medium Hardener was the perfect choice for this step. Using a scale, I weighed out 2 parts resin and 1 part hardener, stirred thoroughly (making sure to scrape the edges of the mixing cup) and added glitter. Pour this mixture into your ornaments, making sure to cover them entirely. Let this cure completely before moving on to the next step.


Step 4: Tape removal and sanding

Once cured, remove the tape from the edges of the ornaments while leaving the tape on the back intact. Using a palm sander, sand the tops and sides of the ornaments until smooth.


Step 5: Applying vinyl

With a vinyl cutting machine, cut out white and metallic trees. I found these tree designs on Envato Elements. Once you have weeded and cut out the tree stickers, start applying the white trees to the sanded ornament. Don’t forget to trim off any excess vinyl.

Step 6: Second layer of epoxy resin

Using MAS Epoxies Table Top Pro, mix 1 part resin and 1 part hardener until fully combined. Pour this mixture onto the ornaments and spread evenly to cover the top and sides. Once this layer is cured, use a sponge sander (or any type of sandpaper) to scuff the surface. This will add some tooth to the epoxy, so the next layer has something to stick to.


Step 7: Repeat

It’s time to repeat steps 5 and 6, but this time use the metallic vinyl trees. Once you coated the ornaments a third time with Table Top Pro, cover them with a cardboard box to protect them from dust, hair, and bugs. Let the ornaments cure completely before moving on to the next step.

Step 8: Tape removal

Your ornaments are almost done but before we get ahead of ourselves, let’s remove the painter’s tape. For this step, use a heat gun for super easy tape removal.


Step 9: Drilling and sanding

To make these fancy coasters into beautiful ornaments, we need to drill a hole in the top of each one. For this step, I used a 3/16” drill bit. After the hole is made, break out your palm sander one more time and give the back of the ornaments a thorough sanding to give it a clean finished look.


Step 10: Finishing touches

If you’re feeling like an overachiever, use a small amount of isopropyl alcohol on a cotton swap to clean out the freshly drilled holes. Don’t forget to sign your work! A wood burning tool worked perfectly for that step. Now it’s finally time to add the ribbon and twine! TIP: Add a drop of glue to the back of each bow to make sure it doesn’t untie over time. And that’s it!! YOU’RE ALL SET!


If you felt inspired by this tutorial to create a 3D ornament of your own, please post and tag @masepoxies #masepoxies on Instagram for a chance to be featured! We love seeing you explore new ways to resin! Stay creative and happy crafting!


Thank you for joining us on this holiday adventure!