null
Skip to main content
DIY BOO Sheet Decorative Hanger

DIY BOO Sheet Decorative Hanger

Posted by sarah@brodsolutions.com BigCommerce on Oct 18th 2022

Learn How to Create This Ghoulish Hanger!

2020 has been a rough year, so let’s have a little fun with this Halloween inspired decorative hanger! Check out the FULL tutorial below to learn how to create a “This is BOO sheet” art piece that is perfect for hanging your face masks, jewelry, keys, dog leashes and more! Don’t miss out on the FREE ghastly ghouls PNG bundle pack to use with your next MAS epoxies project!

window.SHOGUN_IMAGE_ELEMENTS = window.SHOGUN_IMAGE_ELEMENTS || new Array(); window.SHOGUN_IMAGE_ELEMENTS.push({ hoverImage: '', uuid: 's-d86cc22e-fb6c-4d7e-9cfb-dee5913201f8' })

window.SHOGUN_IMAGE_ELEMENTS = window.SHOGUN_IMAGE_ELEMENTS || new Array(); window.SHOGUN_IMAGE_ELEMENTS.push({ hoverImage: '', uuid: 's-1a1333a6-f4ec-47ec-b808-c20723094cd8' })

Materials Used:
  • Table Top Pro epoxy
  • 8 Ghastly Ghouls PNG Bundle Pack
  • iPad Pro with the Procreate app and Apple Pencil
  • Cricut Explore Air 2
  • Variety of vinyl and clear vinyl transfer paper with application tools
  • Fonts from Envato
  • DAP window, door and trim sealant
  • Plastic scraper
  • 120 grit sponge sander
  • Rust-oleum black spray paint
  • Mica Pigment Powder – Black Onyx
  • Extra fine glitter
  • Culinary torch
  • Painter’s tape
  • Screw-in hooks
window.__shgProductInits = window.__shgProductInits || new Array(); window.__shgProductCallbacks = window.__shgProductCallbacks || {}; window.__shgProductComponent = window.__shgProductComponent || {}; window.__shgProductCallbacks["s-5f0bad9d-4544-407b-ac37-7eef582351e3"] = new Array();

window.__shgProductCallbacks["s-5f0bad9d-4544-407b-ac37-7eef582351e3"].push({ cb: "title", data: { uuid: "s-aaca0956-9517-45ed-940d-1a46dc0df18f" } });

window.__shgProductCallbacks["s-5f0bad9d-4544-407b-ac37-7eef582351e3"].push({ cb: "image", data: { uuid: "s-c2191446-17d6-4742-a553-be962ad992e1", imageOffsetTop: 1873, LAZY_LOAD_OFFSET_TOP: 750, LAZY_LOAD_ENABLED: true } });

Sold out window.__shgProductCallbacks["s-5f0bad9d-4544-407b-ac37-7eef582351e3"].push({ cb: "price", data: { uuid: "s-fff1196f-8b2a-4c96-b199-6b1288d57d1d", hasComparePrice: false } });

window.__shgProductCallbacks["s-5f0bad9d-4544-407b-ac37-7eef582351e3"].push({ cb: "addToCart", data: { uuid: "s-9ea350ff-b88e-42d3-a569-56582b61891e", siteId: "364623d2-9ba0-416b-9900-c8ab1232f50d", pageId: "60884253f6b4c900bd2cf13e", pageVersionId: "634eb1bec8cde900e80d1bdd", parentGroupUuid: "s-5f0bad9d-4544-407b-ac37-7eef582351e3", action: "/cart.php", behavior: "go", buttonText: "Add to Cart", successText: "Added to your cart", soldOutText: "Sold out", unavailableText: "Unavailable" } });

window.__shgProductInits.push({ uuid: "s-5f0bad9d-4544-407b-ac37-7eef582351e3", platform: "big_commerce", currency: "USD", moneyFormat: {"USD":{"currency":"USD","currency_symbol":"$","currency_symbol_location":"left","decimal_places":2,"decimal_separator":".","thousands_separator":","}}, productUrl: "https://getshogun.com/api/products", authToken: "eyJhbGciOiJIUzI1NiJ9.eyJzaXRlX2lkIjoiMzY0NjIzZDItOWJhMC00MTZiLTk5MDAtYzhhYjEyMzJmNTBkIiwicHJvZHVjdF9pZCI6IjExMiJ9.2wnqw2qfm7CkatTjHitzj9VaZ5IiTyj5u1EF8Y6AvwY", productHandle: "product/table-top-epoxy", productVariantId: 79 });

window.__shgProductCallbacks["s-5f0bad9d-4544-407b-ac37-7eef582351e3"].push({ cb: "box", data: { uuid: "s-5f0bad9d-4544-407b-ac37-7eef582351e3" } });

window.__shgProductInits = window.__shgProductInits || new Array(); window.__shgProductCallbacks = window.__shgProductCallbacks || {}; window.__shgProductComponent = window.__shgProductComponent || {}; window.__shgProductCallbacks["s-efcb8cb2-7b89-4361-81f6-5cce52702beb"] = new Array();

window.__shgProductCallbacks["s-efcb8cb2-7b89-4361-81f6-5cce52702beb"].push({ cb: "title", data: { uuid: "s-dfbadcf3-3670-4435-b4a2-b89827a28478" } });

Art Pro Epoxy

window.__shgProductCallbacks["s-efcb8cb2-7b89-4361-81f6-5cce52702beb"].push({ cb: "image", data: { uuid: "s-34e0ac5e-571e-47a6-9593-f07245f57cd2", imageOffsetTop: 1873, LAZY_LOAD_OFFSET_TOP: 750, LAZY_LOAD_ENABLED: true } });

Sold out window.__shgProductCallbacks["s-efcb8cb2-7b89-4361-81f6-5cce52702beb"].push({ cb: "price", data: { uuid: "s-c08255c2-cd75-49f0-af62-27314a5d653a", hasComparePrice: false } });

window.__shgProductCallbacks["s-efcb8cb2-7b89-4361-81f6-5cce52702beb"].push({ cb: "addToCart", data: { uuid: "s-c5f3ab89-cdfb-444a-a623-bf69f0a1abc4", siteId: "364623d2-9ba0-416b-9900-c8ab1232f50d", pageId: "60884253f6b4c900bd2cf13e", pageVersionId: "634eb1bec8cde900e80d1bdd", parentGroupUuid: "s-efcb8cb2-7b89-4361-81f6-5cce52702beb", action: "/cart.php", behavior: "go", buttonText: "Add to Cart", successText: "Added to your cart", soldOutText: "Sold out", unavailableText: "Unavailable" } });

window.__shgProductInits.push({ uuid: "s-efcb8cb2-7b89-4361-81f6-5cce52702beb", platform: "big_commerce", currency: "USD", moneyFormat: {"USD":{"currency":"USD","currency_symbol":"$","currency_symbol_location":"left","decimal_places":2,"decimal_separator":".","thousands_separator":","}}, productUrl: "https://getshogun.com/api/products", authToken: "eyJhbGciOiJIUzI1NiJ9.eyJzaXRlX2lkIjoiMzY0NjIzZDItOWJhMC00MTZiLTk5MDAtYzhhYjEyMzJmNTBkIiwicHJvZHVjdF9pZCI6IjExNCJ9.e8h0-F4mQSljbZRaFG2MvUsOrGuVk9nDMv_OmlNcw4Y", productHandle: "product/art-pro-epoxy", productVariantId: 86 });

window.__shgProductCallbacks["s-efcb8cb2-7b89-4361-81f6-5cce52702beb"].push({ cb: "box", data: { uuid: "s-efcb8cb2-7b89-4361-81f6-5cce52702beb" } });


Here's the Full Boo Sheet Tutorial

Step 1: Creating the custom vinyl stickers

For this project I wanted to create some spooky ghost friends for the background of the piece. I used the Procreate app and an Apple Pencil to draw the designs but don’t worry, we did the work for you! You can skip this step and click the link to download the entire Ghastly Ghouls PNG Bundle Pack for FREE! Load the images into your vinyl cutting machine and you’re ready to go! If you do not have a vinyl cutting machine, print the images on computer paper and trace them onto tissue paper. Lay the tissue paper image onto your piece and trace over the lines with a sharpie. The sharpie will transfer through the tissue paper and onto your piece so you can fill in the design with acrylic paint.

window.SHOGUN_IMAGE_ELEMENTS = window.SHOGUN_IMAGE_ELEMENTS || new Array(); window.SHOGUN_IMAGE_ELEMENTS.push({ hoverImage: '', uuid: 's-2639344b-5c83-476d-84df-da58a56d97d7' })

window.SHOGUN_IMAGE_ELEMENTS = window.SHOGUN_IMAGE_ELEMENTS || new Array(); window.SHOGUN_IMAGE_ELEMENTS.push({ hoverImage: '', uuid: 's-9e1c7a30-5870-453a-9621-90f399e8d389' })

Step 2: Preparing the wooden panel

My wooden panel came with multiple crooked hangers attached to the back of the board. Once I removed all of the hangers, I was left with multiple holes to fill. I used a window, trim and door sealant to patch all of the holes and smoothed the sealant out with a plastic scraper. When the sealant was completely dry, I sanded the surface with a 120 grit sponger sander and spray painted the entire piece black (this took about 2 coats). Let the panel dry for 24 hours before moving on to the next step.

window.SHOGUN_IMAGE_ELEMENTS = window.SHOGUN_IMAGE_ELEMENTS || new Array(); window.SHOGUN_IMAGE_ELEMENTS.push({ hoverImage: '', uuid: 's-cdcd78e3-bf95-4c85-8018-0215e9fd6a90' })

window.SHOGUN_IMAGE_ELEMENTS = window.SHOGUN_IMAGE_ELEMENTS || new Array(); window.SHOGUN_IMAGE_ELEMENTS.push({ hoverImage: '', uuid: 's-ea126f68-a3b4-4ada-8d1d-ce8dddb8a862' })

window.SHOGUN_IMAGE_ELEMENTS = window.SHOGUN_IMAGE_ELEMENTS || new Array(); window.SHOGUN_IMAGE_ELEMENTS.push({ hoverImage: '', uuid: 's-d445f368-ba44-4c05-ab7e-abaf6342b77e' })

window.SHOGUN_IMAGE_ELEMENTS = window.SHOGUN_IMAGE_ELEMENTS || new Array(); window.SHOGUN_IMAGE_ELEMENTS.push({ hoverImage: '', uuid: 's-509739a3-68d3-4218-bb02-b2d291152d75' })

window.SHOGUN_SLIDERS = window.SHOGUN_SLIDERS || new Array(); window.SHOGUN_SLIDERS.push({ id: '#slider-s-0e38ad1e-4a3d-4005-a509-a7e85526defd', intervalTime: 5, autoplay: false, pauseOnHover: false, interval: null })

Step 3: Creating depth with layers

Peel and stick the ghost vinyl cut outs to the painted wooden panel. For the first layer, I used 5 ghosts but you can add more or less depending on the size of your panel and the desired design. Pour on a thin layer of Table Top Pro epoxy, tinted with black pigment powder, over your first layer of ghosts. You do NOT want the epoxy to be completely opaque black, just add enough to slightly tint it so you can still see the ghosts through the epoxy. Let the layer cure completely and repeat the above steps. For the last two layers (layer 3-4), resize your ghosts so they are slightly larger. This will give the illusion that the smaller/darker ghosts are further back while the larger/lighter ghosts are closer. For the fourth epoxy coat, do not add any black pigment. Leave the epoxy clear and add a tiny bit of extra fine glitter. Let the layer cure before moving on.

window.SHOGUN_IMAGE_ELEMENTS = window.SHOGUN_IMAGE_ELEMENTS || new Array(); window.SHOGUN_IMAGE_ELEMENTS.push({ hoverImage: '', uuid: 's-b9ff8ab5-3f09-4510-9631-5f6db444bc31' })

window.SHOGUN_IMAGE_ELEMENTS = window.SHOGUN_IMAGE_ELEMENTS || new Array(); window.SHOGUN_IMAGE_ELEMENTS.push({ hoverImage: '', uuid: 's-6b589305-3d41-4d05-ab85-8be442f1be33' })

window.SHOGUN_IMAGE_ELEMENTS = window.SHOGUN_IMAGE_ELEMENTS || new Array(); window.SHOGUN_IMAGE_ELEMENTS.push({ hoverImage: '', uuid: 's-424ab6f5-ab33-467b-bb3d-e3f9134e7b66' })

window.SHOGUN_IMAGE_ELEMENTS = window.SHOGUN_IMAGE_ELEMENTS || new Array(); window.SHOGUN_IMAGE_ELEMENTS.push({ hoverImage: '', uuid: 's-d004e250-e8e0-40a2-bf16-c5f1caaf009f' })

window.SHOGUN_IMAGE_ELEMENTS = window.SHOGUN_IMAGE_ELEMENTS || new Array(); window.SHOGUN_IMAGE_ELEMENTS.push({ hoverImage: '', uuid: 's-c73ae15b-42c8-4f71-9452-3160d6ce4b23' })

window.SHOGUN_SLIDERS = window.SHOGUN_SLIDERS || new Array(); window.SHOGUN_SLIDERS.push({ id: '#slider-s-14c0946c-f0be-4d6b-bdd5-1308697f23eb', intervalTime: 5, autoplay: false, pauseOnHover: false, interval: null })

Step 4: Adding the words

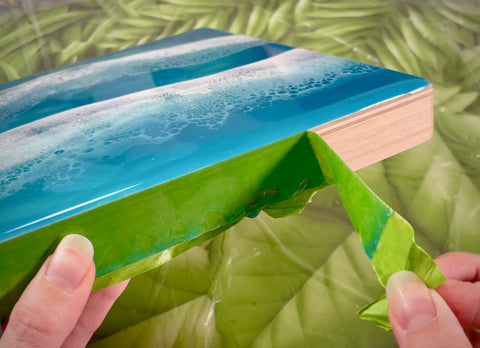
Once you have your words centered, use painter’s tape to tack down one side of the vinyl and peel a bit of the backing off of the opposite side. Press down firmly on the sticker, remove the painter’s tape and peel the backing off of the other side. Smooth down the vinyl and repeat with all remaining words. Add one last layer of clear epoxy to finish off the piece.

window.SHOGUN_IMAGE_ELEMENTS = window.SHOGUN_IMAGE_ELEMENTS || new Array(); window.SHOGUN_IMAGE_ELEMENTS.push({ hoverImage: '', uuid: 's-595c8cbb-9567-4e10-aeb7-ee4942e4a588' })

window.SHOGUN_IMAGE_ELEMENTS = window.SHOGUN_IMAGE_ELEMENTS || new Array(); window.SHOGUN_IMAGE_ELEMENTS.push({ hoverImage: '', uuid: 's-d4c654e6-6bb5-4cf9-b2d9-1a9d76a79582' })

window.SHOGUN_IMAGE_ELEMENTS = window.SHOGUN_IMAGE_ELEMENTS || new Array(); window.SHOGUN_IMAGE_ELEMENTS.push({ hoverImage: '', uuid: 's-a1e7ed2e-7216-4d07-85c4-96c1a2ecb32e' })

window.SHOGUN_SLIDERS = window.SHOGUN_SLIDERS || new Array(); window.SHOGUN_SLIDERS.push({ id: '#slider-s-aeccd8e7-9197-4204-8195-0999dcc2e8e5', intervalTime: 5, autoplay: false, pauseOnHover: false, interval: null })

Step 5: Finishing touches

If you want to take this project to the next level, add some screw-in hooks to hang your masks, keys, dog leashes and more! Attach saw tooth hangers to the back of the piece for easy hanging!

window.SHOGUN_IMAGE_ELEMENTS = window.SHOGUN_IMAGE_ELEMENTS || new Array(); window.SHOGUN_IMAGE_ELEMENTS.push({ hoverImage: '', uuid: 's-0d183ebf-7c7b-44fe-a915-66dfd14af9c9' })

Don’t forget to sign your beautiful artwork! I used a paint pen to sign the back of the piece. If you felt inspired by this tutorial to create a piece of your own, please post and tag @masepoxies #masepoxies on Instagram for a chance to be featured! We love seeing you explore new ways to resin! Stay creative and happy crafting!


window.SHOGUN_IMAGE_ELEMENTS = window.SHOGUN_IMAGE_ELEMENTS || new Array(); window.SHOGUN_IMAGE_ELEMENTS.push({ hoverImage: '', uuid: 's-fc382c18-d169-4e79-b1bc-fdeab4cb4a76' })

Thank you for joining us on this spooky DIY adventure! To get started on your own ghoulish piece, check out the MAS Table Top Pro system used in this tutorial!

window.SHOGUN_IMAGE_ELEMENTS = window.SHOGUN_IMAGE_ELEMENTS || new Array(); window.SHOGUN_IMAGE_ELEMENTS.push({ hoverImage: '', uuid: 's-acc150e0-d9e4-4e2b-a2ec-dc9566d1393f' })