
Only Four Tools Needed to Create This Epoxy Resin River Console Table
Have you ever wanted to build an epoxy river table but stopped because you needed all the fancy power tools you see being used on social media? Don't worry; TK Fareed will show us how she created a beautiful epoxy river console table with only FOUR tools! Continue reading to see how she did it!
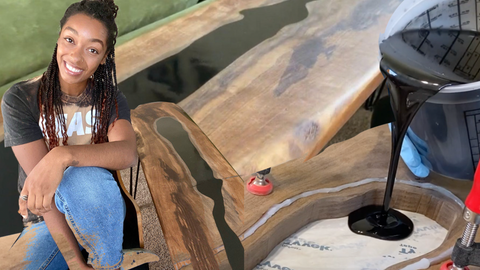
"For my first ever YouTube video, I built an epoxy river console table using MAS Epoxies Deep Pour Epoxy and a $62 piece of rough-cut dimensional lumber. My goal for this project was to see if I could build a basic river table, with minimal tools, in a small shop. I was able to create this epoxy resin river inlay with only four tools: A Ryobi jigsaw, an electric hand planer, a cordless drill, and a Craftsman random orbital sander. In an effort to be as minimal as possible, I didn’t even make a “real” mold to pour the epoxy resin inlay section… I just used a ton of Tyvek tape on the underside of the table and put a line of silicon around the perimeter. And get this: It actually held up without any leaks!"

Here's a Little More About TK
I started working with epoxy resin and wood in the Spring of 2020, right after I got out of the Navy after serving 6 years Active Duty. I love that the possibilities of working with epoxy resin are literally only as limited as your imagination. Since I also work with hardwoods and do some woodworking, I have the ability to create functional artwork that serves a purpose, like furniture and home decor, as well as traditional artwork. There are so many different styles and trends to explore, and since the medium is still such a new niche in the art world, there’s so much room for artists to create totally new concepts that no one’s ever seen before! I never want to stop learning something new. That’s it. My brand is basically about using my base knowledge to figure stuff out as I experiment with things that are new to me. I hope my content inspires and empowers other people to start pursuing what inspires them, too!

Materials Used
- MAS Deep Pour Epoxy
- Locally Sourced Rough Cut Dimensional Walnut Lumber
- Meguiar’s Ultra Cut Compound 105 (Mirror Glaze)
- Rubio Monocoat Wood Oil Plus 2C Hardener Pure
- Polishing Drill Attachment Kit
- Ryobi Cordless 18V Jigsaw
- Ryobi Cordless 18V Drill
- Armor Art Epoxy Pigment Black
- Dianka Pours Premium Pigment Powder Satin Black
- Tyvek Tape
- Craftsman Random Orbital Sander 5”
- Ryobi 6Amp Corded Electric Hand Planer
- Gator 5” Random Orbit Hook and Loop Sanding Discs (40 Grit - 220 Grit)
- 3M Respirator
Check out TK's Full Video Tutorial
Let's Make an Epoxy Console Table
1. Source Your Lumber
I usually try to source my lumber locally, to support local small businesses, and to send a little piece of where I live to places all over the country. You can find lumber suppliers in your area by searching in Google, Facebook, or Instagram!

2. Shaping the Faux Live Edge
Using 40 grit sandpaper on an orbital sander, sculpt the desired shape you want to resemble an organic live edge slab. This is where you can turn anything that would normally be viewed as flaws (dents, chips, cracks, knots, etc.), and you can turn them into highlights to give your piece character! After designing your initial shape, soften the rough edges with 120 grit sandpaper, then finish with 220 grit sandpaper.

3. Cutting Out the Epoxy Inlay Section
After drawing out the shape you want for your epoxy river or inlay area, use a jigsaw to hollow out the void. This step can take quite a while, so remember to be patient with it. If needed, take a break, get a snack, walk the doggo, and come back to it after getting your strength back up. This part is a marathon, not a sprint! It can also help to use your drill with a larger bit to make holes at areas with hard turns that the jigsaw might struggle getting around. This will help make your relief cuts easier too!

4. Tyvek Tape...Lots of It!
After cleaning any sawdust off your lumber, use Tyvek tape to seal your epoxy river inlay area. Make sure to tape 3” or more outside of your void to ensure your tape barrier is making good contact with the wood. An optional step is to create a silicon dam around the perimeter of your river area. This allows you to slightly over-pour your inlay (to allow for shrinkage, small leaks, etc) without letting your resin overflow onto the rest of your wood. The last thing anyone needs is a river running rampant!

5. Pouring the Epoxy Resin River
For this kind of project, the MAS Epoxies Deep Pour Epoxy System is the perfect kit to fill the entire river in one pour! This is a great advantage for projects where you don’t want to have to struggle with color matching multiple pours. I tinted mine with the Satin Black Premium Pigment Powder from Dianka Pours, and Black Armor Art Epoxy Pigment. The Deep Pour Epoxy takes 3-4 days to harden enough to use tools on effectively, so you’ll get plenty of time to practice having patience!

6. Planing & Sanding
After the epoxy resin has cured, it’s time to plane it down flat and sand it to the desired finish! Use your electric hand planer to carefully take down the high areas until they’re flush with the wood. Once you get everything nice and level, use your orbital sander to get rid of any machinery marks or sharp areas. The wood is a lot more forgiving than the epoxy will be, so I’d recommend NOT skipping sanding grits (up to 340 grit) when going over the epoxy river section. Really take your time with this step, being careful not to move too quickly and cleaning each area of dust frequently to avoid getting those annoying little pigtails. It helps to keep a wet rag close by to wipe the area free of dust frequently.
7. Wet Sanding
Grab a bowl of warm soapy water, a rag to wipe the area frequently, and either a sanding pad attachment for your drill or a handheld sanding pad. This is another step where it’s important to take your time and wipe the area frequently. You might be surprised at how much you can cut with 1000 grit sandpaper, so as long as you did a good job dry sanding the river up to 340, then there’s no need to start lower than that! Fill your bowl with new soapy water in between of each grit and wipe down the surface with cotton balls and rubbing alcohol to thoroughly remove any debris from the previous grit. Step up your sanding grits from 1000 grit up to either 1500 or 2000 grit depending on your desired shine finish.

8. Buffing & Polishing the River
Apply a small amount of Meguiar’s Ultra Cut Compound directly onto the epoxy, as well as a few drips on the buffing pad itself. Use the buffing pad to smear the compound around evenly like cream cheese on a bagel. You’re going to buff the epoxy twice: The first time you should apply more pressure with lower RPM, and the second time you should apply less pressure at a higher RPM. Wipe off any excess or residual compound after the second pass!

9. Apply Wood Finish
Apply either Rubio Monocoat Plus 2C Hardener, Osmo Oil, or any other high-quality furniture finish you prefer. In my honest opinion, Rubio holds up really well over time through daily wear and tear and is easy to clean and maintain; however, it does noticeably yellow lighter colored wood like the sapwood areas of walnut! Spread the wood finish evenly across the entire wood surface, paying special attention to those thirsty crosscut sections. Take your time and work in small enough areas that you can complete within 15 minutes. Use a clean lint-free cloth to rub the wood deep into the grain and remove all excess oil. The surface should feel dry to the touch when you’re done. After 15 minutes, you can’t take too much off, but you can leave too much on!

10. Attach Your Legs
Last Step! Flip your table over and line up your table legs in the desired location. I like to use painter’s tape to make sure they’re equidistant and to mark where I want them. Use your drill to drill through the marked holes, being mindful of the thickness of your wood, so you don’t repeat my dumb mistake. Screw in your chosen table legs, make sure they’re securely installed, flip it over so it’s right side up, and style as desired. The End!


Comments (0)
There are no comments for this article. Be the first one to leave a message!