
How to Tape Your Edges
Have you ever wondered how to create a perfectly clean edge on your epoxy resin project? Are you tired of spending hours sanding away all the resin drips on the back of your pieces? This tutorial will walk you through the basics of applying and removing tape so you can achieve the flawless finish you were hoping for. This application and removal process will work for almost any DIY project and is so simple! Get ready to have the crispest edges ever!

Materials Used
- Table Top Pro epoxy
- Wooden panel
- FrogTape painter’s tape
- Scissors
- Brush on gloss varnish
- Plastic spreader
- Mermaid Trash resin pigments drops
- Heat gun
Watch The Video Tutorial
Here's the Full Taping Tutorial!
Step 1: Let's get started
Before mixing up your MAS Epoxies resin, let’s get your edges masked off so we can eliminate those epoxy resin drips! Make sure that your substrate is clean and dry before applying any tape to the surface. Once you have your supplies handy, decide what areas of your substrate will be masked off. My go-to painter’s tape is FrogTape. This is a premium grade masking tape with paint block technology that helps prevent paint bleed and does not leave behind a sticky residue.

Step 2: It's taping time!
For this demonstration, I will be masking off the side edges of a wooden panel. Measure a piece of tape that is slightly longer than one of the sides. Letting about half an inch on both sides hang off, line up the top edge of the tape with the top edge of the panel. Carefully work your way across one side of the panel with the tape. Firmly press down the tape and pull the overhanging tape taut while wrapping it around the corner. Continue this step until all sides are taped.

Step 3: Don't forget the back!
Let’s work on the back edges of the panel. Flip the piece upside down and use your scissors to make a slit in each corner of the tape. Fold each tape flap down so it lays nice and flat. With your plastic spreader, firmly press down the tape and smooth out any air bubbles. Depending on the size and shape of your piece, you might have to apply more tape to cover any exposed substrate that would be in the path of the dreaded resin drips. If you’re a bit EXTRA like me, use the spreader one last time to guarantee a perfect seal.

Step 4: Extra Credit!
If you want to be 100% sure that you get ZERO bleed through, I have just the trick for you! Using a water-based varnish, brush on a thin layer to where the tape meets the panel. The varnish will dry clear and create a leak proof seal! Wait until the varnish is completely dry before pouring your epoxy resin.

Step 5: Get creative with epoxy!
I made sure to put this tape application through the ringer! Using MAS Epoxies Table Top Pro epoxy system and multiple shades of blue pigment, I attempted an epoxy resin dirty pour. If you would like to see the full resin dirty pour tutorial, stay tuned to our monthly blog posts! Now let’s see how the tape application holds up to the layers of colored epoxy!

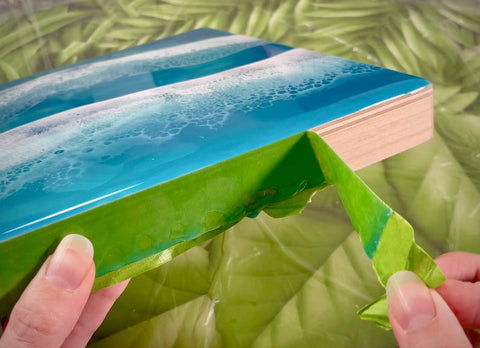
Step 6: Tape removal
Once the epoxy is cured, it’s time to remove the tape. For easier tape removal, use your heat gun to slightly soften the epoxy edge and loosen the tape adhesive. Gently peel away the tape and reheat the area whenever it gets tough to pull. Be careful, the tape may be warm!

Sometimes the epoxy will form a slight ridge or lip but don’t worry, it’s an easy fix! Smooth down any ridges with a palm sander or sandpaper. As always, don’t forget to sign your beautiful artwork! If you felt inspired by this tutorial, please post and tag @masepoxies #masepoxies on Instagram for a chance to be featured! We love seeing you explore new ways to resin! Stay creative and happy crafting!

Thank you for joining us on this terrific tape adventure! To get started on your own epoxy resin piece, check out the MAS Table Top Pro system used in this tutorial!


Comments (1)
Great tips, thank you. I cannot find any tips for applying resin to all sides. I decided to put it on a post that will be installed in a museum. 3 sides are done, but now to get the final side done without the drips….
I can’t wait to try the painting with soap and spray paint.