null
Skip to main content

DIY Epoxy Resin Gem Table with Jessica Abella

Mar 17th 2022

Learn How to Make a Gemstone Table with Resin


Who knew creating a gemstone table could be so easy and fun!? Jessica from @jessicaabella_ was kind enough to walk us through her entire process from start to finish. Read on to find out how she recreates these faux stones out of MAS Epoxies epoxy resin and turns them into functional art by making them into tables!


Here's a Little More About Jessica!


Hi, I'm Jessica! I’m a part-time artist hoping to transition into making art full time one day. I graduated with my BFA in photography in 2014. After graduation, I branched out and tried experimenting with different mediums to express myself. Epoxy brought a whole new process into my work. As a photographer, most things are visual and then manipulated later on in the editing process. However, with epoxy you can create that manipulation with your own hands. Being able to produce movement and texture is really what sparked my interest in the first place, the combinations are unlimited! My favorite part of the process is locking myself in my studio and just letting the creativity flow. It’s always an amazing feeling when you envision something in your mind and are able to get the outcome you pictured.


Use Code: ABELLA for 10% OFF + FREE Shipping


Table Top Pro Epoxy for epoxy resin table
Sold out

Art Pro Epoxy
Sold out

Check Out Jessica's YouTube Tutorial


Let's Make A Resin Gemstone Table!

Step 1: Get the right mold

You’re going to need a mold that’s at least 1 inch deep. I have several custom molds from Danner Builds that I use specifically for these tables. You can also find them from other sellers, or you can create your own using a piece of plastic (I suggest a shower curtain) and some silicon to outline a shape. I prefer to use a mold, so I know the table will be completely level. I have tried using silicon but find it extremely difficult to get it perfect. If you’re using the silicon method, you will need to measure and make sure your overall pour is at least an inch thick. The reason why you need it to be over an inch, is because you will be adding screws to the surface. I will explain more in depth when we get to that step.

Step 2: Mold release

I like to use coconut oil as a base, so it makes it easier to pop out of the modular mold. You may also need a mallet for that extra push to release it. Never use the coconut oil on the actual surface, but just along the edges of the mold.

Step 3: Base layer

Start off with mixing paint into MAS Epoxies’ Table Top Pro epoxy resin and using it as a base layer. This will help give a base layer of color. These tables are always done in 2 pours, so the details do not get lost. The reason I start off with paint is so the table won’t be completely transparent. We will have to hide the screws so they don’t show from the top of the surface, which is why it’s important that you’re using a mold that’s at least 1” thick.


Step 4: Add that shine

For this specific table, I used a roll of holographic paper (found at Michaels) and some iridescent sheets. I use these materials to mimic the reflection of light, the same way that opal does. Let this layer cure before moving on to the next step.


Step 5: Color

After the first layer is cured, it’s time for those details! For this Fire Opal table, I’m using a combination of ink, pigment, and paint to create texture. First, I lay down the orange and yellow ink to further the overall color of the table. This also allows the holographic paper to change in color but to still be seen. You want to be sure you are using holographic paper that is close to the color you want. For example, if I were to use a blue roll of iridescent paper instead of yellow, the color would become a cooler shade no matter what color ink I lay on top of it.

Step 5 continued: Texture

I then go in with some paint (that is mixed into MAS Epoxies’ Table Top Pro epoxy resin) and pour it along the sides, to give the illusion that you’re looking into a stone. This also helps create some really cool textures within the piece. I personally always like to add at least one mica pigment for that luxurious shine. In this case, I chose blue since Fire Opal does have small pops of blue. When you use all three materials together it brings dimension into the piece since they all work with resin differently.

Step 6: Movement

Make sure the ink is blending well with the paint and pigment. You’re going to use your heat gun a lot during this process. You want to heat the resin so it blends all of the colors together. If you don’t, it will just sit the way you poured it. If you want to create movement you will have to move the resin, simple as that!

Step 7: Taking it out of the mold

When taking your piece out of the mold, this is when your trusty mallet comes into play. Sometimes, I have a hard time getting it out, but you just need to use some muscle! Never use the mallet on the actual surface but alone the edges of the mold. You might need to sand the edges after taking it out of the mold for a perfectly smooth finish.

Step 8: Flood coat

The flood coat is the most important part. Sometimes, when you’re working with pigment or paint, it will give a dull finish when it’s dry. So, you’ll probably want to go in with another layer of clear MAS Epoxies Table Top Pro epoxy resin to make sure you’re bringing that shine back to life.


Step 9: More sanding

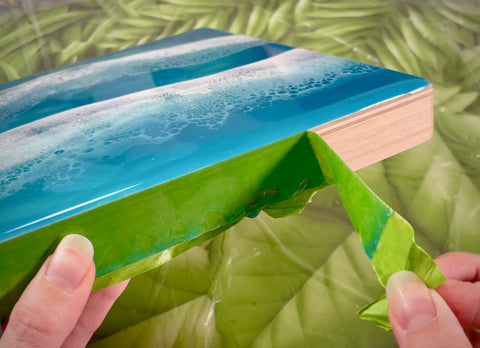
While you can use latex or tape on the bottom to mask off the back from resin drips, I prefer to just sand the drips off. Even when you use latex or tape, you will still have some sharper edges that will need to be sanded for a perfect finish.


Step 10: Adding the legs

I line up the legs on the back to see where I want them to sit. For stabilities sake, you don’t want to put them too close to the middle; I usually try to push the legs out as far as I can. Once you find a good place for them, you will have to mark where the screws go with a marker. You will later go in and predrill these holes with your drill bit.

Step 11: Predrilling the holes

Like I mentioned previously, you will be adding ½” screws directly into the table. To accomplish this, you’ll need to use a drill bit to pre-drill holes. Measure your drill bit to make sure you do not screw through the surface. The goal is to only screw it into the first layer, so you won’t be able to see them. This is why I suggest creating an opaque layer of paint and resin for the bottom. You also need to make sure your drill bit is the correct size. If it’s too large the screws will be loose, and if it’s too small, it won’t screw in all the way (I usually use 5/64”). Once the legs are securely in, your table is good to go!!


Mistakes were made: I have used the wrong size before, which made screws visible from the top. When this happened to me, I wound up pouring another layer of resin with some pigment to cover up the mishaps. You don’t want this to happen to you!! So, make sure you are measuring everything correctly!!


Step 12: It’s finished!

Flip the table over and check out your new piece art!!


More Amazing Gem Pieces by Jessica!