null
Skip to main content
Topographic Lake Map with Owasso Woods

Topographic Lake Map with Owasso Woods

Posted by sarah@brodsolutions.com BigCommerce on Jan 28th 2021

About 8 months ago I stumbled upon a very unique and beautiful piece of work on Instagram. It was a slab of wood with a map of a lake that was filled in with epoxy. At first, I noticed it was a lake here in Minnesota. I did a bit more digging to find out that Owasso Woods was located right here in Minnesota. Exchanging messages back and forth I had got to know the owner, Brad Wieck. Not only was Brad local, he lives 5 minutes from our facility! We thought it would be a great piece of content to collaborate on and build a one of a kind piece. Below is some info about Owasso Woods.

“By now, you likely know that I’m drawn to water. Whether it be fishing and boating in the summer, or skating on the frozen lake during the winter, water is special to me.
 

I love the idea of a challenge but, sometimes a challenge is simply having an idea. I found my idea in the lakes that I love. I’ve always been someone that’s fascinated in maps and geography but, due to the barrier of water, lakes seem a bit more “out of reach” when it comes to discovery. With that in mind, I had this idea to capture the topography of lakes, and bring that “out of reach” aspect, just a bit closer to us.

The Owasso Woods Lake Series are custom designed topographic maps of the lakes we know and love. Each piece is custom designed to order, whether it be wall art for the home office, or a coffee table for that cabin or lake home of yours.

These pieces are truly one of a kind, and I hope they bring you as much joy as the lake itself.”

– Brad Wieck

Create and Cut

Brad creates the maps on his computer by merging multiple maps to get as much detail as possible. After getting to know his process, this is what separates himself from others. Once the map is created, he uses his favorite bit, Amana Spektra 46225-K 1/8” from @toolstoday.

“It lasts forever and provides super clean cuts. Its my go-to for cutting lake topography details.”

Once the machining was complete, the next step was to apply a seal coat of epoxy to this beautiful slab of maple.

Seal Coat

We jumped right into the project and began applying a seal coat of MAS Penetrating Epoxy Sealer to the entire piece of wood. We mixed up 16 ounces of PES using the correct 2:1 mix ratio. Once thoroughly mixed we applied it to the slab using a foam brush.

This step is key to prevent the wood from moving over time with temperature and humidity changes. When applying epoxy to wood, make sure the wood is dry and contains very low moisture content. Whatever you do to the top you need to do to the bottom and edges to prevent warping and cupping over time.

Once the entire piece was coated, we let epoxy cure overnight. We sand down the surface and scuff sand the contour lines using 180 grit sandpaper. Once sanded, we wiped down the surface with denatured alcohol.

Deep Pour

Now that the slab of maple has been sealed, sanded and wiped clean, we applied a bead of silicone around the perimiter of the map just in case we had some overflow while pouring. We mixed a total of 48 ounces of MAS Deep Pour epoxy at the correct 3:1 mix ratio and tinted it with blue alcohol ink.

Once the epoxy was thoroughly mixed, we filled in the contour map. This project was ideal for Deep Pour epoxy due to the slow cure time which allowed us to do it all in one pour. The epoxy was fully cured after 36 hrs at 70F.

Once the epoxy was fully cured, Brad machined the piece flat with his CNC machine 1/16″ to remove the silicone and epoxy that slightly overflowed. To customize this piece even further, Brad machined “Wapogasset Lake” onto the slab. After the slab was flattened and engraved, we sanded it with 180 grit and prepared it for the final top coat of epoxy.

Flood Coat with Table Top Pro Epoxy

Our last step in the project was applying a final clear coat using MAS Table Top Pro epoxy. We mixed a total of 32 ounces of epoxy at the correct 1:1 mix ratio for around 3 minutes until it was thoroughly mixed.

Proper mixing is key to getting a flawless clear coat. Make sure there are no striations visible and you scrape the edges of the cup to ensure a thorough mixture. Once fully mixed, we allowed the epoxy to sit for around 5 minutes at 70F to allow air bubbles to release to the top.

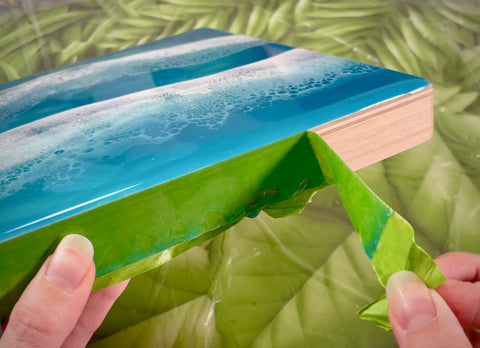
Pour the epoxy onto the center of the surface and spread evenly towards the edges. This can be done with your gloved hand, plastic spreader, notched trowel or brush. We allowed the epoxy to self level and run over the edges of the piece. Using our gloved hand we rubbed epoxy onto the edges.

After 10 minutes we applied heat using a propane torch to eliminate the air bubbles. This was repeated 3 times in 10 minute intervals.

Finished Piece of Wapogasset Lake

This was by far one of my favorite pieces to work on. The detail, clarity and glass like finish makes this piece truly one of a kind. Throughout the process Brad and I started talking about new creative ideas utilizing his CNC machine, map making ability and MAS Epoxies.

If you’re interested in having a custom lake map created for your home, cabin or office reach out to Brad at Owasso Woods for more information or check out his Facebook page @owasssowoods

Products Featured in this Project!

Sold out

Sold out

Sold out