
Learn How to Cast the Perfect 2-Layer Dominoes
Have you ever wondered, “Why am I getting holes in the corners of my dominoes?” Are you having trouble removing bubbles from your domino molds? Bubbles can cause your domino casts to have empty corners...which no one wants! If this has happened to you, Annie from Annie’s Art Studio is here to help! She has some great tips, tricks, and things to avoid in order to make the perfect domino set every time!

Here's a Little Bit More About Annie
Coming from a 3D Animation and Visual Effects background, Annie has been in the resin art industry for 8 years now. She brings in her love of 3D into all of her resin pieces while layering her projects. She is known for her layered Pyramids, Fruit paintings, and Dominos that all went viral within the past couple years. Annie considers herself an art educator and loves guiding/teaching the maker community through her social media pages and specifically her YouTube channel.
Annie loves using the Flag and Medium epoxy system for her layering because of its quick cure time! You can try the Annie’s Art Studio Craft Kit for the same formula in smaller volume! Make sure to check out Annie’s website for her shop and all her social links.
Check Out Annie's Full Video Tutorial
Let's Make a Domino Game Set!
Step 1: Clean the Silicone Mold
The first thing you want to do when creating your dominos is to make sure you have a clean mold. If your mold has been previously used, you might have some cured resin drips remaining. Your first step will be to take some masking tape and press it along the inside of the mold cavities to remove them. This also helps remove any dust or fibers that might have settled in your mold.

Step 2: Pouring the First Layer of Epoxy Resin
You are now ready to pour your resin. To avoid having air bubbles in the corners of your dominos you want to slowly pour your resin in the middle of the cavity, letting the resin flow freely and self-level to the corners. When creating a two-layer domino, you want to fill no more than 40-50% of the cavity on your first pour. Just make sure all the domino dots in the mold are covered in resin.

Annie’s Pro Tip: "Using a low viscosity resin will ensure you have less bubbles in your cast. The MAS Epoxies Flag System plus the Medium Hardener is the best system for this project. If wanting a smaller size of this system, the Annie’s Art Studio Craft Kit is the same system formula in a smaller volume."

Step 3: Popping Bubbles
It’s now time to remove the bubbles that have made their way to the surface of the resin. Fill a small spray bottle with 70-90% isopropyl alcohol. Let your resin sit for a few minutes, and with a light spray of the Isopropyl alcohol, all those bubbles will disappear!
Annie’s Pro Tip: "To avoid the resin bonding to the mold, never use a torch to pop the bubbles. This will ruin your cast and mold while demolding."

Step 4: Adding Decorations
If you will be adding any kind of decorative add-ons such as fruit pieces or wood cutouts, this is the time since you will need to add these items BEFORE your resin cures. To avoid your resin curing before you can add them, make sure the add-ons are prepped and ready before you mix and pour your resin. To ensure a flat back to your dominos, make sure that the decorative added items are not sitting higher than the top of the mold. (This is why it is important that the first layer of resin fills no more than 40-50% of the cavity.)

Step 5: Pouring the Second Layer of Epoxy Resin & Demolding
Once the first layer of resin is completely cured, it’s time to pour the back layer! For the perfect back, pour your resin up to the top edge of the mold first and then add a few extra drops of resin to get the slightest dome. Over-doming will cause the resin to spill over and flow into the next cavity. This will happen specifically when using the isopropyl alcohol spray again to pop the bubbles in this layer. Let this layer sit for a few minutes and once again use your alcohol spray to pop bubbles. Depending on the decorative add-ons you use, you could have bigger bubbles pop up while this layer is curing. Check this layer every 15 minutes or so for the next hour and continue popping bubbles if needed. Let your entire casting cure for 24 hours to avoid having fingerprints on your dominos while demolding.


Annie’s Pro Tip: "Are you wondering how to tell when the first layer is cured enough? When using the Flag System and Medium Hardener, waiting about three hours will be fine. To check if it’s cured enough, poke the resin with a craft stick. If the stick leaves an indent, let the layer cure for a bit longer. FYI: When using the Table Top Pro or Art Pro systems, you will need to wait longer for the layer to cure."

Step 6: Preparing the Needle Point Squeeze Bottles
You are now ready to dot your dominos! For this step you will need a needle point bottle filled with your desired acrylic paint dot color. I find that looser paints work best. Adding a few drops of water into the needle point bottle of acrylic will help the paint flow from the needle easier. Add a few drops at a time until you get your desired consistency.

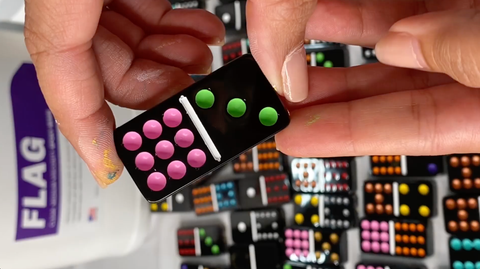
Step 7: Finishing Your Dominoes
While filling the dot cavities, squeeze a small amount of paint into the cavity and twirl it around using the needle to cover the entire area. You don’t want to fill the dot to the top. This will cause cracks. If you have a touch of paint on the top of the domino, let it sit and dry. Don’t clean it while wet or it will make a mess and spread all over. Once your dots dry, use a paper towel with some isopropyl alcohol and wipe the excess off. Sometimes even a little scratch with your nail will clean it right up. Let the paint in the dots fully dry and you have your perfectly made domino set.


Comments (0)
There are no comments for this article. Be the first one to leave a message!