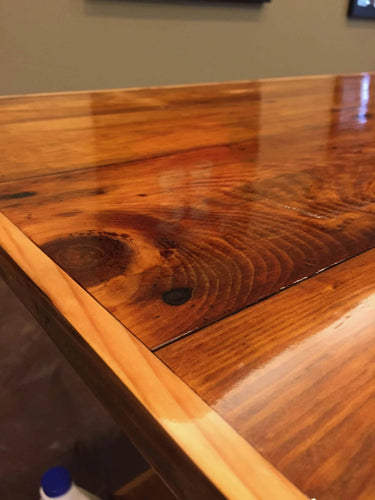
Thanks to Greg Carlson, owner of Century Farmstead, who built MAS Epoxies a custom conference room table. He made it out of reclaimed barn wood that is over 100 years old! We decided it would be a great company project to apply our Table Top Epoxy system. We figured it was necessary since the Table Top Epoxy would protect our table from coffee stains and scratches. But first, we had to seal the table off to prevent the Table Top epoxy finish from leaking. Below the process of applying a table seal coat prior to using Table Top Epoxy is outlined.
For best results this product should be used at 70-80˚F. First, you should apply a thin seal coat to the table top or bar top and any object that will be embedded. Delicate objects that may be damaged by epoxy resin such as photographs, should be sealed with an alternate clear coat (i.e. polyurethane or acrylic sealers) to protect them prior to embedding. Once the seal coat has set, additional flood coats up to 1/8” thick may be applied. Before applying a table top epoxy, we recommend two thin seal coats with lightly sanding the epoxy in between coats.
Table Seal Coat Steps:
MAS 2:1 Non-Blushing Epoxy is an easy to use system following these simple steps.
-
First, pour Low Viscosity Resin into cup and mix Slow Hardener at a 2:1 mix ratio by volume.
-
Thoroughly mix resin and hardener for 2-3 minutes.
-
Next, pour epoxy into larger knot, cracks or seams to start.
-
Using a foam brush or squeegee, spread epoxy across surface evenly.
-
Once surface is covered. Let epoxy set, look for leaks or voids and plug with tape from the bottom.
-
Wait for epoxy to cure. Lightly sand and apply the second coat.
Now you’re ready to table top epoxy your surface or protect it with varnish!
Below is the step by step process we used on our conference table that was custom built out of reclaimed barn wood. This process will work for your table seal coat as well.
STEP 1
Sand down surface and make sure it is completely level. Then, tape off any voids underneath the table to prevent seal coat of epoxy from dripping.
STEP 2
Mix MAS Low Viscosity Resin and Slow Hardener at a 2:1 mix ratio by volume. Slow hardener will provide the longest working time of about 4 hours working in temps above 60 degrees F.
(2oo grams Resin – 100 grams Hardener)
STEP 3
After thoroughly mixing MAS Low Viscosity Resin and Slow Hardener, coat the entire table with epoxy. Be sure to fill in all voids on the surface. Because some voids may require more epoxy to fill them completely check for dry spots on your surface. Also take into consideration the leaks some knots, cracks or seams may have.


Comments (0)
There are no comments for this article. Be the first one to leave a message!