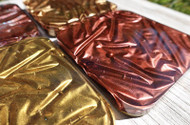
DIY Crushed Velvet Resin Effect
Posted by Kelly Johnson on Oct 8th 2021
Learn How To Create Velvet Resin Coasters
The ‘Crushed Velvet’ resin effect is making a comeback!
We've been on the lookout for creative techniques to share with you, and y'all...we have just found the perfect one! Have you seen the 'Crushed Velvet' resin trend that has been circulating on Pinterest and YouTube? It is an incredibly easy and fun technique for beginners and pros alike. We can't wait to see your spin on this effect!
Materials Used:
- Annie’s Art Studio Crafting Resin Kit
- Silicone coaster set mold
- Saran plastic wrap
- Metallic mica powders
- Black resin pigment
- Paint brush
- Mixing sticks
- Mixing cups
- Rubbing alcohol
- Paper towels
- Adhesive cork backings
Here are the epoxy resin systems that were used in this project!
We will be using Annie’s Art Studio Crafting Epoxy Kit or you can also use Flag and Medium. This is a versatile 2:1 system that is perfect for casting resin up to a 1/2” in silicone molds and it has a lower viscosity with excellent bubble release (thinner than ArtPro and TableTop Pro).
Before you scroll, check out the process video!
Woot Woot! You made it to the full tutorial!
Step 1: Mixing and pouring epoxy resin
After properly mixing your epoxy resin, pour a thin layer into your coaster mold. I filled my molds about a third of the way to leave room for two more layers (which will be explained later in the tutorial). After pouring, wait about 5 minutes before starting the next step.
Step 2: Creating the ‘Crushed Velvet’ texture
Tear off a piece of plastic wrap that is slightly larger than your coaster mold (you will need one piece of plastic wrap per coaster). Since you waited about 5 to 10 minutes after pouring the epoxy, it will make these next steps a lot easier! First spray a bit of rubbing alcohol onto the epoxy to pop any bubbles that may have risen to the surface. Place the single sheet of plastic wrap over the epoxy filled coaster mold and GENTLY press the plastic onto the surface of the resin. Use your fingers to lightly pinch the plastic and epoxy resin, which will form a rippled surface texture. Repeat this step to each coaster and let cure for about 2 hours.
Step 3: This is oddly satisfying
I know it was hard to not touch these molds for 2 hours but now you will be rewarded with the most satisfying step! Slowly and carefully peel the plastic wrap from the cured epoxy. If mixed and cured properly, the plastic should release easily from the epoxy and leave behind an awesome texture! After your plastic wrap is removed, you can dip a dry paint brush into metallic mica powder and brush the entire surface of the textured epoxy. This isn’t required, but after brushing on the mica, I tapped off any extra powder into the trash.
Step 4: Adding more layers of resin
Mix up another batch of Annie’s Art Studio Crafting Resin and use your favorite pigment to color it a solid black. Pour the black epoxy on to the mica painted epoxy so that it completely covers the first layer. Let this cure for 2 hours before adding some rubbing alcohol to a paper towel and wiping down the entire mold and cured epoxy to clean off the excess mica powder. Now start mixing up another batch of epoxy and pigmenting it with a color that complements your design. Finally, you can finish filling in the entire mold with this pigmented epoxy.
Step 5: Demolding the epoxy resin
Once the epoxy has cured for 24 hours, carefully unmold your ‘Crushed Velvet’ coasters, and admire your amazing work! If there are any rough edges, take this time to gently sand them down or you can even use a deburring tool.
Step 6: Finishing touches
To protect the back of the coasters and your furniture, stick on some adhesive cork dots or full cork backings. There are a ton of options to pick from on Amazon or at your local craft store.
If you felt inspired by this tutorial to create a ‘Crushed Velvet’ piece of your own, please post and tag @masepoxies #masepoxies on Instagram for a chance to be featured! We love seeing you explore new ways to resin! Stay creative and happy crafting!

