
Epoxy Resin Tips for Beginners
These are our top tips for working with epoxy resin!
Thinking about trying epoxy for the first time? This is a great place to start! Here are 6 epoxy tips for beginners.
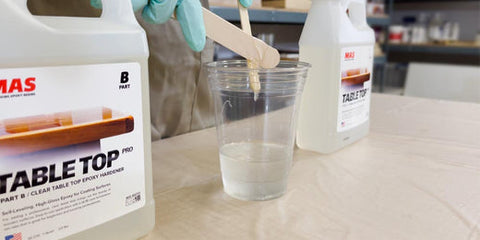
1. Mixing epoxy properly is a very important step, maybe even the MOST important.
To achieve a glossy, hard-finished surface, make sure your epoxy is mixed correctly. If your epoxy projects end in a sticky mess or have millions of bubbles, it's usually because this first crucial step went wrong. The video and information in these blog posts will help you mix epoxy resin without bubbles.
Watch this video - The Ultimate Guide to Mixing Epoxy Resin
Mixing is so important that we created an entire YouTube video on it. Before starting your first project, you should definitely watch this video and check out The Ultimate Epoxy Resin Mixing Guide (linked below). The video has an awesome visualization for unmixed resin that will result in a gooey mess and we encourage you to watch the video with the sound on - it's worth it.
There's a lot of great information in that blog post, so definitely check it out. If you don't have the time now, bookmark it for later and educate yourself with these spoilers:
- Power drills are not always your friend (watch the video to learn why).
- Temperatures above 70 degrees F are great for avoiding air entrapment.
- Striations are bad, but a cloudy phase is normal.
- Scrape the side walls and bottom of you container.
Read more: The Ultimate Epoxy Resin Mixing Guide
Read more: The Easiest Way to Measure Epoxy by Volume
2. Epoxy gets Hot as it Cures.
An exothermic reaction is when epoxy gets hot. Why is it important to know that epoxy gets hot? Because you don't want to be surprised by it in your workshop. Once epoxy resin is mixed with it's hardener, a chemical reaction begins - the one that gives you the beautiful glass-like finish. On the way to that glassy coating, the two components will heat up. You want this to happen on your finished project, not in your mixing cup.
Watch this video - Why is my Epoxy Resin Hot and Smoking?
Why does epoxy get hot? Some exotherm is crucial for the epoxy to cure. Too much exotherm can cause issues like - yellowing, surface imperfections and excess shrinkage of your finished piece.
Here are some ways to avoid excessive heat when working with epoxy:
- Have everything ready before you start mixing - exotherm is more likely to occur in larger masses like your mixing cup than when poured on your surface.
- Only mix what you need - same principle as above, excess resin in the cup will heat up faster.
- Use the right system for what you're trying to make. For example, if you're casting, look into using a Deep Pour system like Deep Pour or Deep Pour X.
- Keep your workspace cool - heat begets heat.
Read More: Why is my Epoxy Resin Hot and Smoking?
Be-get - Definition
1. Typically of a man, sometimes of a man and a woman) bring (a child) into existence by the process of reproduction
"they hoped that the King might beget an heir by his new queen"
2. give rise to; bring about
"success begets further success"
3. Not All Epoxy Systems are the Same.
You might see the phrase "they're all the same" get thrown around on message boards or Facebook groups, but that's not reality. We hinted at this a little bit in our previous tip. Even if you can get similar results using different systems or different brands, all epoxies are not created equal.
For example, if you use one of our top selling products, Table Top Pro Epoxy, to make a large casted project without step pouring, you'll have some serious issues. We make a product specifically for that, which is Deep Pour X.
You can check out this article that does a deep dive into commonly asked questions about which products to choose, reach out to us on social, or at hello@masepoxies.com for a product recommendation specific to your application.
Read More: Which Epoxy Resin Should I Use?
window.__shgProductCallbacks["s-57bc5ec6-38a2-4496-b34f-ce69992fa995"].push({ cb: "image", data: { uuid: "s-1f1abd1a-cf38-45bb-9e7f-874423e4ba07", imageOffsetTop: 3877, LAZY_LOAD_OFFSET_TOP: 750, LAZY_LOAD_ENABLED: true } });
window.__shgProductCallbacks["s-57bc5ec6-38a2-4496-b34f-ce69992fa995"].push({ cb: "addToCart", data: { uuid: "s-1e78e069-4b2e-4df1-bf32-b6957c181ec6", siteId: "364623d2-9ba0-416b-9900-c8ab1232f50d", pageId: "61327045f8f3e300a76630c0", pageVersionId: "613b74eb99c07c0102c7bc46", parentGroupUuid: "s-57bc5ec6-38a2-4496-b34f-ce69992fa995", action: "/cart.php", behavior: "go", buttonText: "Add to Cart", successText: "Added to your cart", soldOutText: "Sold out", unavailableText: "Unavailable" } });
window.__shgProductInits.push({ uuid: "s-57bc5ec6-38a2-4496-b34f-ce69992fa995", platform: "big_commerce", currency: "USD", moneyFormat: {"USD":{"currency":"USD","currency_symbol":"$","currency_symbol_location":"left","decimal_places":2,"decimal_separator":".","thousands_separator":","}}, productUrl: "https://getshogun.com/api/products", authToken: "eyJ0eXAiOiJKV1QiLCJhbGciOiJIUzI1NiJ9.eyJzaXRlX2lkIjoiMzY0NjIzZDItOWJhMC00MTZiLTk5MDAtYzhhYjEyMzJmNTBkIiwicHJvZHVjdF9pZCI6IjExMiJ9.3mgGGXamtIW7mma3EnpxH2wUdUQ69a7WBicJiPluOH4", manual: true });
window.__shgProductCallbacks["s-57bc5ec6-38a2-4496-b34f-ce69992fa995"].push({ cb: "box", data: { uuid: "s-57bc5ec6-38a2-4496-b34f-ce69992fa995" } });
window.__shgProductCallbacks["s-a593e10d-4305-4df0-99bc-4910c1deaaec"].push({ cb: "image", data: { uuid: "s-9f42ca8e-3115-4055-9c7d-a03b1b2f79c8", imageOffsetTop: 3877, LAZY_LOAD_OFFSET_TOP: 750, LAZY_LOAD_ENABLED: true } });
window.__shgProductCallbacks["s-a593e10d-4305-4df0-99bc-4910c1deaaec"].push({ cb: "addToCart", data: { uuid: "s-d0e65dd7-1d01-43ac-97f3-532603811397", siteId: "364623d2-9ba0-416b-9900-c8ab1232f50d", pageId: "61327045f8f3e300a76630c0", pageVersionId: "613b74eb99c07c0102c7bc46", parentGroupUuid: "s-a593e10d-4305-4df0-99bc-4910c1deaaec", action: "/cart.php", behavior: "go", buttonText: "Add to Cart", successText: "Added to your cart", soldOutText: "Sold out", unavailableText: "Unavailable" } });
window.__shgProductInits.push({ uuid: "s-a593e10d-4305-4df0-99bc-4910c1deaaec", platform: "big_commerce", currency: "USD", moneyFormat: {"USD":{"currency":"USD","currency_symbol":"$","currency_symbol_location":"left","decimal_places":2,"decimal_separator":".","thousands_separator":","}}, productUrl: "https://getshogun.com/api/products", authToken: "eyJ0eXAiOiJKV1QiLCJhbGciOiJIUzI1NiJ9.eyJzaXRlX2lkIjoiMzY0NjIzZDItOWJhMC00MTZiLTk5MDAtYzhhYjEyMzJmNTBkIiwicHJvZHVjdF9pZCI6IjExMyJ9.ARFVjiancQf7PdTt2Q1IxKKs1pJxMPwm0c5-lKWpvvs", manual: true });
window.__shgProductCallbacks["s-a593e10d-4305-4df0-99bc-4910c1deaaec"].push({ cb: "box", data: { uuid: "s-a593e10d-4305-4df0-99bc-4910c1deaaec" } });
window.__shgProductCallbacks["s-58144a30-ed88-45be-bb7c-0678cc826dce"].push({ cb: "image", data: { uuid: "s-9265ffd2-8d7b-44cc-b057-8b8852e295ca", imageOffsetTop: 3877, LAZY_LOAD_OFFSET_TOP: 750, LAZY_LOAD_ENABLED: true } });
window.__shgProductCallbacks["s-58144a30-ed88-45be-bb7c-0678cc826dce"].push({ cb: "addToCart", data: { uuid: "s-969d5a3a-5efb-43a7-8528-7375a8e975f7", siteId: "364623d2-9ba0-416b-9900-c8ab1232f50d", pageId: "61327045f8f3e300a76630c0", pageVersionId: "613b74eb99c07c0102c7bc46", parentGroupUuid: "s-58144a30-ed88-45be-bb7c-0678cc826dce", action: "/cart.php", behavior: "go", buttonText: "Add to Cart", successText: "Added to your cart", soldOutText: "Sold out", unavailableText: "Unavailable" } });
window.__shgProductInits.push({ uuid: "s-58144a30-ed88-45be-bb7c-0678cc826dce", platform: "big_commerce", currency: "USD", moneyFormat: {"USD":{"currency":"USD","currency_symbol":"$","currency_symbol_location":"left","decimal_places":2,"decimal_separator":".","thousands_separator":","}}, productUrl: "https://getshogun.com/api/products", authToken: "eyJ0eXAiOiJKV1QiLCJhbGciOiJIUzI1NiJ9.eyJzaXRlX2lkIjoiMzY0NjIzZDItOWJhMC00MTZiLTk5MDAtYzhhYjEyMzJmNTBkIiwicHJvZHVjdF9pZCI6IjExNiJ9.6cN6P1LKtNi_y4WTPuaYJaHG0758mQislApC19k_Myc", manual: true });
window.__shgProductCallbacks["s-58144a30-ed88-45be-bb7c-0678cc826dce"].push({ cb: "box", data: { uuid: "s-58144a30-ed88-45be-bb7c-0678cc826dce" } });
window.__shgCategoryInits.push({ uuid: "s-1efb1515-bbd1-411c-9503-5d7735a4fe4d", handle: "category", apiUrl: "https://getshogun.com/api/categories/6053590fd91b660004ab8957/products?site_id=364623d2-9ba0-416b-9900-c8ab1232f50d", platform: "big_commerce", authToken: "eyJ0eXAiOiJKV1QiLCJhbGciOiJIUzI1NiJ9.eyJzaXRlX2lkIjoiMzY0NjIzZDItOWJhMC00MTZiLTk5MDAtYzhhYjEyMzJmNTBkIiwiY2F0ZWdvcnlfaWQiOiI2MDUzNTkwZmQ5MWI2NjAwMDRhYjg5NTcifQ.aMhBWO2fdV52IU-NKXbfizJ7hr7s3CeDlTkXk8d6vzQ", selectedVariants: JSON.parse("{\"112\":\"78\",\"113\":\"82\",\"116\":\"95\"}") });
4. Preparation is Key!
Prepare your workspace and materials. Things go fast once your epoxy is mixed (see tip 2) so you want to have your space and materials prepared before you start measuring and mixing your epoxy.
What should I prepare before starting an epoxy project?
- Prepare the surface you are going to coat. Ensure it is free of dust, oils or other contamination. The best way to do this is use a soft t-shirt rag (or something else that won't leave behind fuzzies) doused in denatured alcohol. And/or prior to pouring, you can use an air compressor or shop vac to eliminate any dust particles, hair or fuzzies that may be on the surface
- Prepare your workspace. Have your pigments, tools, mixing sticks, personal protection equipment, and any other materials ready before you start measuring and mixing.
- Check that your tools are clean and free from dust. We know no space is completely free from dust so here are some tips from our experts.
"Have a spray bottle of water in your workspace to spray the room before you start. This will capture dust in the air so it doesn't float into your piece." - Hailey
"Grab a box or plastic tub to put over your piece to prevent dust from falling onto it and getting stuck while curing." - Kelly
5. Start Small!
We know epoxy is expensive compared to other finishing products for wood and art. Try your concept on a smaller scale before experimenting on a custom art piece, heirloom furniture, or that expensive wood slab.
Why start small? Once epoxy cures it is meant to be permanent! Epoxy can preserve your table, art, or furniture, but that same feature makes it tough to remove.
If you talk to us on the phone, this is one of our top recommendations!
Watch this video - How to Make Epoxy Resin Layered Art
Here are some smaller project ideas to get you started! Excellent epoxy resin crafts for beginners.
Try One of our Smallest Kits! Both are a good epoxy for beginners.
window.__shgProductCallbacks["s-841b5fdc-2bfa-41ef-b125-9cadbefc5749"].push({ cb: "image", data: { uuid: "s-393fc3f6-a14b-4f8a-98f6-691a024d23df", imageOffsetTop: 6147, LAZY_LOAD_OFFSET_TOP: 750, LAZY_LOAD_ENABLED: true } });
window.__shgProductCallbacks["s-841b5fdc-2bfa-41ef-b125-9cadbefc5749"].push({ cb: "addToCart", data: { uuid: "s-d768426d-97ad-4bfa-91c8-382ed9ddf82a", siteId: "364623d2-9ba0-416b-9900-c8ab1232f50d", pageId: "61327045f8f3e300a76630c0", pageVersionId: "613b74eb99c07c0102c7bc46", parentGroupUuid: "s-841b5fdc-2bfa-41ef-b125-9cadbefc5749", action: "/cart.php", behavior: "go", buttonText: "Add to Cart", successText: "Added to your cart", soldOutText: "Sold out", unavailableText: "Unavailable" } });
window.__shgProductInits.push({ uuid: "s-841b5fdc-2bfa-41ef-b125-9cadbefc5749", platform: "big_commerce", currency: "USD", moneyFormat: {"USD":{"currency":"USD","currency_symbol":"$","currency_symbol_location":"left","decimal_places":2,"decimal_separator":".","thousands_separator":","}}, productUrl: "https://getshogun.com/api/products", authToken: "eyJ0eXAiOiJKV1QiLCJhbGciOiJIUzI1NiJ9.eyJzaXRlX2lkIjoiMzY0NjIzZDItOWJhMC00MTZiLTk5MDAtYzhhYjEyMzJmNTBkIiwicHJvZHVjdF9pZCI6IjExNCJ9.BgyNJnYhWdkxM7k7Oe2MJcTzIXDa5xyp9I1DBf6xZhE", productHandle: "product/art-pro-epoxy", productVariantId: 86 });
window.__shgProductCallbacks["s-841b5fdc-2bfa-41ef-b125-9cadbefc5749"].push({ cb: "box", data: { uuid: "s-841b5fdc-2bfa-41ef-b125-9cadbefc5749" } });
window.__shgProductCallbacks["s-7003f766-ce67-4d7a-98aa-fe36d98b3212"].push({ cb: "image", data: { uuid: "s-2ecda3ca-fed4-4fa0-87b9-92c7c7a7d36e", imageOffsetTop: 6147, LAZY_LOAD_OFFSET_TOP: 750, LAZY_LOAD_ENABLED: true } });
window.__shgProductCallbacks["s-7003f766-ce67-4d7a-98aa-fe36d98b3212"].push({ cb: "addToCart", data: { uuid: "s-5dd2dae5-069c-4b67-8a23-a641956cf133", siteId: "364623d2-9ba0-416b-9900-c8ab1232f50d", pageId: "61327045f8f3e300a76630c0", pageVersionId: "613b74eb99c07c0102c7bc46", parentGroupUuid: "s-7003f766-ce67-4d7a-98aa-fe36d98b3212", action: "/cart.php", behavior: "go", buttonText: "Add to Cart", successText: "Added to your cart", soldOutText: "Sold out", unavailableText: "Unavailable" } });
window.__shgProductInits.push({ uuid: "s-7003f766-ce67-4d7a-98aa-fe36d98b3212", platform: "big_commerce", currency: "USD", moneyFormat: {"USD":{"currency":"USD","currency_symbol":"$","currency_symbol_location":"left","decimal_places":2,"decimal_separator":".","thousands_separator":","}}, productUrl: "https://getshogun.com/api/products", authToken: "eyJ0eXAiOiJKV1QiLCJhbGciOiJIUzI1NiJ9.eyJzaXRlX2lkIjoiMzY0NjIzZDItOWJhMC00MTZiLTk5MDAtYzhhYjEyMzJmNTBkIiwicHJvZHVjdF9pZCI6IjE2MSJ9.vK9W9mdtXQb1PS5TX1sgbpzsInt1in80kKLOFhcKHI8", productHandle: "product/annies-art-studio-crafting-epoxy-resin-kit", productVariantId: 218 });
window.__shgProductCallbacks["s-7003f766-ce67-4d7a-98aa-fe36d98b3212"].push({ cb: "box", data: { uuid: "s-7003f766-ce67-4d7a-98aa-fe36d98b3212" } });
6. Epoxy can Yellow.
While epoxy has wonderful properties that protect things from water and other elements - it does have one enemy - UV rays. Epoxy is not inherently UV resistant. So, you'll want to protect it from the sun or it may turn yellow over time. Often you won't notice yellowing on tinted pieces, but be aware when using white.
The exception is Art Pro! We have added UV inhibitors that stood up to hours of UV testing both in the lab and in the real world. The UV inhibitors were added to help preserve the white and clear portions of your work that might have exposure to some direct or indirect light over time - like in a gallery setting.
For outdoor projects we recommend coating your piece with a UV protectant like our Bristol Finish UV Clear system or another clear polyurethane.
Here's another tip from our project experts.
"Add a few drops of black or blue alcohol ink to your work to help combat any yellow hue. It depends on how large your piece is, but often you can't tell that pigment was added at all, your project looks clear from the beginning and stays clearer over time." - Derek
Watch this video - Why the heck is my Epoxy Hardener Yellow?
Another type of yellowing that can occur is in the container. We made a video about proper storage to avoid this discoloration over time. Definitely watch this if you have leftover epoxy after completing your first test project!
Also! Don't throw away epoxy that has yellowed in the container. Here's how to fix yellowed epoxy: either add some blue or black pigment as Derek suggested above until the yellow color is masked. Or add black mica or mixol pigment - black pigment will cover any yellowing from epoxy and can add edgy touch to your projects.
Do you have other tips you want to share?
Share your tips with us and our friends on social! Use #masepoxies and #masepoxiestips on your posts!
You may also like:
window.SHOGUN_IMAGE_ELEMENTS = window.SHOGUN_IMAGE_ELEMENTS || new Array(); window.SHOGUN_IMAGE_ELEMENTS.push({ hoverImage: '', uuid: 's-94ea316d-9a0b-4886-811e-a3c917f78452' })


Comments (0)
There are no comments for this article. Be the first one to leave a message!