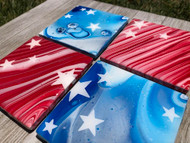
DIY Patriotic Epoxy Resin Coasters
Posted by sarah@brodsolutions.com BigCommerce on Jun 25th 2020
Learn how to make your own patriotic coasters!
This fun and easy DIY epoxy resin coaster set will definitely jazz up your coffee table or office for your summer of fireworks and grill-outs! Follow along with this step-by-step tutorial and learn how to create these unique DIY Fourth of July coaster set for your home! Happy crafting!
Materials needed for DIY Patriotic Drink Coasters
- 4” square tiles
- Frog Tape painter’s tape
- Painter’s pyramids
- Artist’s Loft acrylic paints – Crimson, Phthalo Blue and Titanium White
- Flood Floetrol (Clear latex paint additive) or any pouring medium
- Spot On treadmill belt lubricant 100% silicone oil
- White Posca paint pen
- Table Top Pro Epoxy
- Adhesive cork backing
- Starbond medium adhesive
- Liquitex gloss varnish
- Wood burning tool
How to make coasters with epoxy resin: Full Tutorial
Step 1: Prepare your DIY Coasters
Cover the backs of your 4” square tiles with painter’s tape to protect them from paint and excess resin. Wipe off the tops with a clean rag and rubbing alcohol to remove any dust and oils before getting started.
Step 2: Mix your Paints
Every artist has their own recipe for their acrylic pours that works perfectly for them. My mix ratio is 1:1 acrylic paint and floetrol. I also add just a splash of water to create a honey/syrup/melted ice cream consistency. Once you have your red, blue and white paints mixed and in separate cups; add 2 drops of silicone oil to your blue paint and slowly stir/fold it in.
Step 3: The Acrylic Pour
Elevate your DIY epoxy resin coasters with painter’s pyramids or empty cups. Start layering your blue and white paints into a small cup. Once you have enough paint to completely cover the surface of the coaster (and then some), flip the cup onto the coaster and gently lift the cup to reveal the paint pour. This technique is called a “dirty pour”. With your gloved hands, carefully lift and tilt the coaster to stretch the paint and let the excess drip off the sides. Let’s move on to the red and white coasters. Layer the white and red paints into a cup in the same way as we did with the blue and white. This time we are going to hold the cup and slowly pour lines of paint onto the coaster. This technique is called a “ribbon pour”. Once the piece is covered slowly tilt some of the excess paint off and stretch the lines of color into the desired design. Use a torch to lightly pop the bubbles that have formed in the acrylic paint. Let the coasters dry for AT LEAST three days before moving onto the next step.
Step 4: Cleaning the Coasters & Painting the Stars
Before adding any designs to our coasters, we need to clean off any excess silicone oil. Using a soft cloth dipped in a mixture of warm water and Dawn dish soap, wipe down the blue coasters. Follow this up with a dampened cloth (no soap) and then a dry cloth to ensure that the coasters are clean and dry. Use a pencil to sketch out where you would like to place your stars. I filled in these sketches with a white Posca paint pen but any acrylic paint or brush will work. Let dry completely before moving onto the resin pour.
Step 5: The Resin Pour
Dust off your coasters with a large, clean and dry paintbrush. Pour your prepared Table Top epoxy onto the surface of the coaster. Use either a popsicle stick or gloved hand to ensure that the sides and tops are completely covered with epoxy. Follow up with a torch to gently pop any bubbles. Cover coasters with a box to protect them from dust, hair or any other contaminates and let cure.
Step 6: Add the Finishing Touches
Once your coasters have completely cured, turn them over on a soft surface (I used a silicone mat) and start peeling off the tape. A heat gun will help in the removal process. Once the tape has been removed, use an 120 grit sponge sander or dremel to sand down any sharp edges. I like to finish the back edges with a coat of acrylic paint that compliments or matches the design on the front. You can also add a layer of varnish for a shiny, gloss finish. Adhere your precut, adhesive cork backing and don’t forget to sign your work! I love using a wood burning tool to burn my logo into the cork.
Final Thoughts
Please, make sure to let your coasters cure for 5-7 days after pouring. Once they are completely cured, they will be perfect for your summertime beverages! Now that you know how to make coasters with epoxy resin, you can pour yourself a celebratory drink! Stay creative and happy crafting!

